Images are an essential part of blog posts and using visual elements is definitely among the best practices of creating blog content. You probably already know that. But do you ever ask yourself if the way you are using images on your blog is the most effective?
In order to dispell any doubts you may be wrestling with, in this post, we will discuss how to use images in blog posts in depth. We will talk about why you should do so in the first place and then give you detailed tips on how to best use blog images.
In the end, we want you to feel like you know how to use visuals in your blog content in a way that enhances it and makes it more effective.
Can you already picture it? No? I’m drawing a blank as well. Sounds sketchy? I’m just trying illustrate a point. (My deepest apologies. Please leave your favorite image-related pun in the comments).
Why Should You Use Images in Your Blog Content?

You are most likely aware that using images in blog content is a good idea. However, let’s go over quick refresher why, so that you are more motivated to implement the advice below.
Humans Are Visually Oriented
The first thing to remember is that humans are visual creatures. We are much better at remembering visual information than mere facts. It’s the reason why many memory techniques are based on turning information into images so that you can remember it better.

As a consequence, we are much more drawn towards visuals than just text. It’s the reason why video content has exploded in recent years. 82% of Internet traffic are predicted to come from video in 2022.
Need further proof? In 2021, the short-video platform TikTok managed to become the most frequented domain in the world, removing Google from the thrown in the process.

In addition, you know what’s the second largest search engine in the world? It’s YouTube (though with some caveats).
Visuals Make Content Easier to Consume
So, people are visually oriented. So far so good. However, in addition to simply being a thing that we as humans are into, visuals in your blog content also offer other benefits:
- Make scanning easier — According to a study by Nielsen, only around 20% of visitors will end up reading your entire blog post, the rest skim. Consequently, since images transport a lot more information, you do the majority of your audience a great service by including them.
- Break down long stretches of text — Images make your blog posts more exciting than simply a wall of text. Together with proper formatting, that makes your content more pleasant to consume and easier to comprehend.
- Add personality — Good use of images can further accentuate the personality of the writer and the tone of the article.
- Affect SEO — Images also play a role in SEO. Using them is a great way to add more information for search engines to your content.
Convinced yet? Then, let’s talk about ways to put this knowledge into practice.
How to Properly Use Images in Blog Posts
Here are our best practices for how to use blog images on your site.
1. Use a Lot of Them
The first step for increasing the effectiveness of your blog images is to use a sufficient number of them. As mentioned, the job of visuals is to keep readers on the page. Think of them as breadcrumbs that guide your visitors along.
So, how many is the right number?
Well, a BuzzSumo study showed that articles with an image every 75-100 words are shared almost twice as often as those with fewer images.
However, if you don’t want to go ahead and start counting words, a good rule of thumb is to use enough images so that, no matter where a visitor is on your page, they always have a visual element in their field of vision. Besides images, that can also be embedded videos, embedded social media posts, etc.
2. Choose Images That Are Relevant and Add Value
While it’s important to use a lot of images, it’s just as important to not simply include them just for the sake of it (e.g. because we say so). Any image appearing in your web content should both be relevant and add to what the text is saying.
For example, if I were to add an image of a piece of broccoli in this post, it would confuse you rather than add to your experience.

Sure, here it also functions as a negative example but, aside from that, it doesn’t really contribute anything to the post. On the other hand, the quote image below is both on topic and further expands on a point I am already making.

Makes a lot more sense than the broccoli, doesn’t it?
For that reason, whenever you think about adding a visual to your content, always ask yourself the following questions:
- Is it relevant to the topic of the piece overall?
- Is it relevant to the part of the article it is located in?
- Does it add value for the reader?
If the answer to any of these questions is no, it’s usually better to omit the particular image. In addition, you may consider whether an image fits your existing color scheme and visual language. All of the above is especially important for the featured image.
3. Make Use of Charts and Graphs
Charts and graphs are a great way to pack a lot of information into very little space. Here is one that explains how HSV color space works from our article on declaring colors in CSS:

They not only make articles more compelling to look at but also reinforce your points and act as proof for your claims. In addition charts and graphs help visualize data in an easy-to-grasp way that mere text often can’t. Consequently, if you can find any that fit with the content of your article, be sure to use them!
They are also relatively easy to create, e.g with Imgflip, Canva, or Visme. Even Excel or Google Sheets are able to produce graphs that you can easily screenshot.
Plus, there are other options for data visualization, like diagrams or infographics. The latter also work especially well on social media. If you can produce a valuable and good-looking infographic, it can bring in tons of views and traffic.
Finally, charts, graphs, and other data visualizations are highly reusable. You can use them in several articles to make the same or a similar point. They are also a great way to gain backlinks, since they are so popular.
4. Include Images of People
Humans are social animals. We are hardwired to look at people and – in particular – faces. Eye-tracking studies show that our gaze is magically drawn to them.

That’s one of the reasons why about pages are often one of the most visited pages of websites. We want to connect with real people, not faceless (pun intended) websites. Therefore, including images of people on your site or blog when it makes sense should definitely be part of your best practices.
You can also go one step further and use them to direct your visitors’ attention. Another thing that studies have shown is that we direct our attention where other people look.

You can use this to get your visitors to focus where you want them to. More about that in our science-based web design tips.
5. Take Advantage of Screenshots
Screenshots are super useful when you write tutorials or any kind of instructions that help readers do things on their computers.
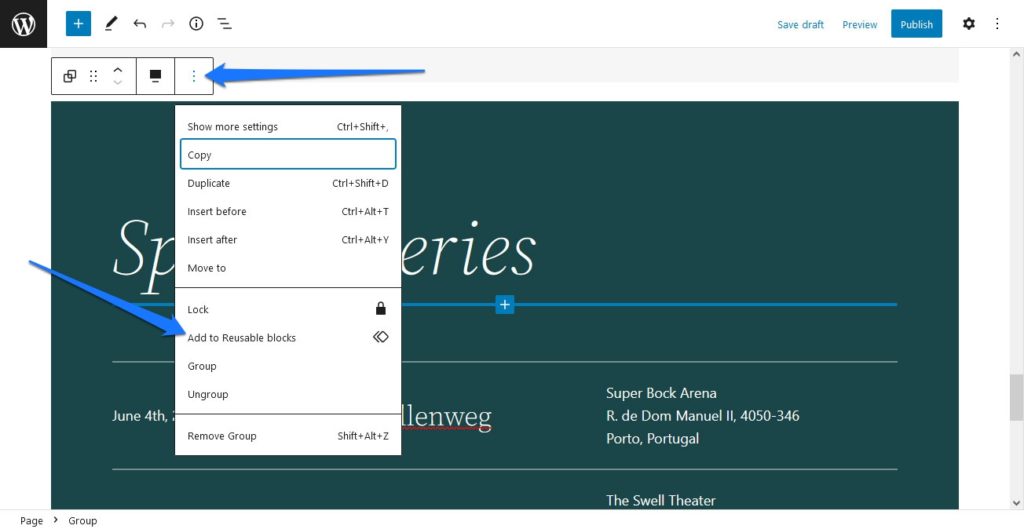
They make instructions much clearer than if you describe the same thing only in words and they are also perfect for scanning. Plus, screenshots are very easy to produce.
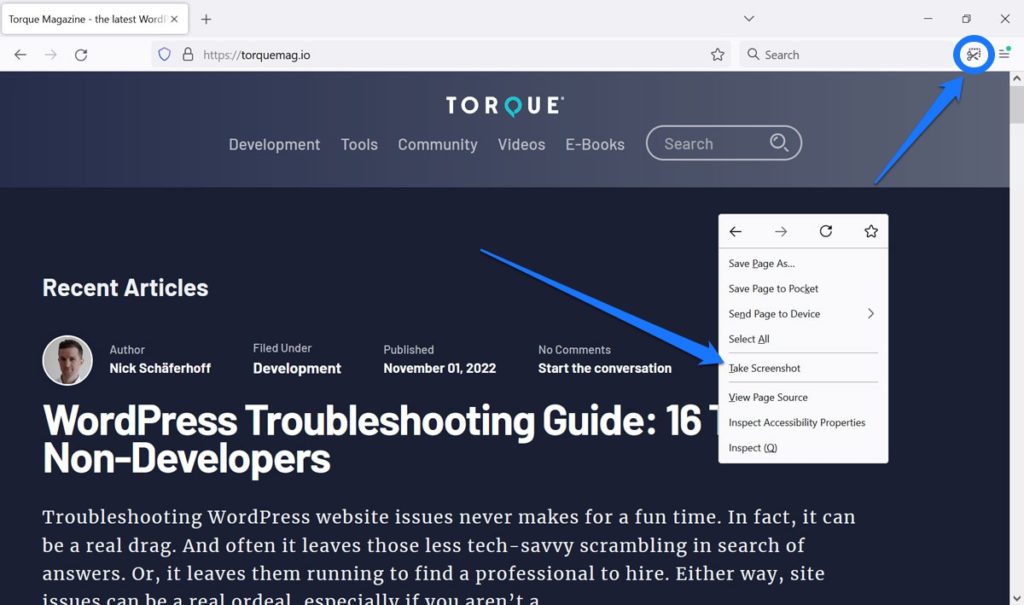
If you are a Firefox user, your browser has the functionality built in. Simply right-click on a page and choose Take Screenshot. You can also place a button for the same thing in the toolbar at the top.
In Chrome, there are browser plugins like Awesome Screenshot for screengrabs. In addition, computers come with the ability take them as well. On Mac, you can capture the entire screen by pressing Cmd+Shift+3 and grab a selection with Cmd+Shift+4. On a Windows PC, use the Windows button plus Print instead.
Finally, to annotate your screenshots, a good tool is Skitch (you can also find Windows version), which provided the annotations in this article. Snagit is a another, paid option.
6. Create Your Own Images
Besides taking screenshots, it’s generally a good idea to try and create your own images. This is especially since we have become quite adapt at filtering out stock photography.
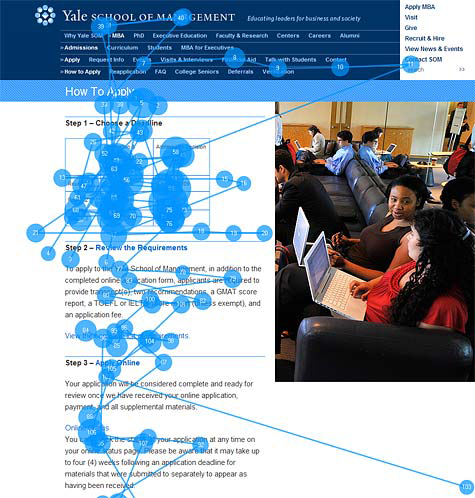
Therefore, among the best practices to stand out from the masses is to make your own blog images. Here are a few options for that:
- Take your own photos — Especially if you run something like a food or travel blog, this is par for the course. Readers expect you to provide self-made image material.
- Use professional photos — I once worked with a client who had a stock photo on their About page. I only realized it when I found the same image on a stock photo site. Until that point, I thought those were actual employees and the office interior. Imagine my disappointment. Don’t do that. Hire someone to take actual photos of the people in your company.
- Turn quotes into images — If you need avisual to spruce up your content and you don’t have anything handy, why not turn the text itself into one? You can always take a meaningful quote from your article make a picture out of it. There are several tools that make this really easy, such as Pablo or the aforementioned Canva. You can also do this for social media using your headline.
- Try your hand at illustrations — If you are marginally talented with pencil and paper, you can also consider creating your own illustrations. Draw, scan, polish digitally, and you are ready to go. A website that does this really well is Enchanting Marketing.
Of course, there are other ways to create your own unique images, not least if you are a designer and know your way around Photoshop or Illustrator. For the rest, there are still the tools mentioned throughout this post.
7. Include Videos With Attractive Thumbnails
Using visuals in your articles is not limited to just images. As already demonstrated, videos and their thumbnails also fulfill the same role.
However, make sure that the video is a) relevant and b) has a good-looking thumbnail. If it’s from your own YouTube channel, even better!
8. Go for Gifs and Memes
If you spend any time around popular entertainment sites such as Reddit, you will quickly figure out that gifs and memes have pretty much become the currency of the Internet. There’s something about them that people simply seem to love and Internet users appear to be in constant competition to create the best ones.
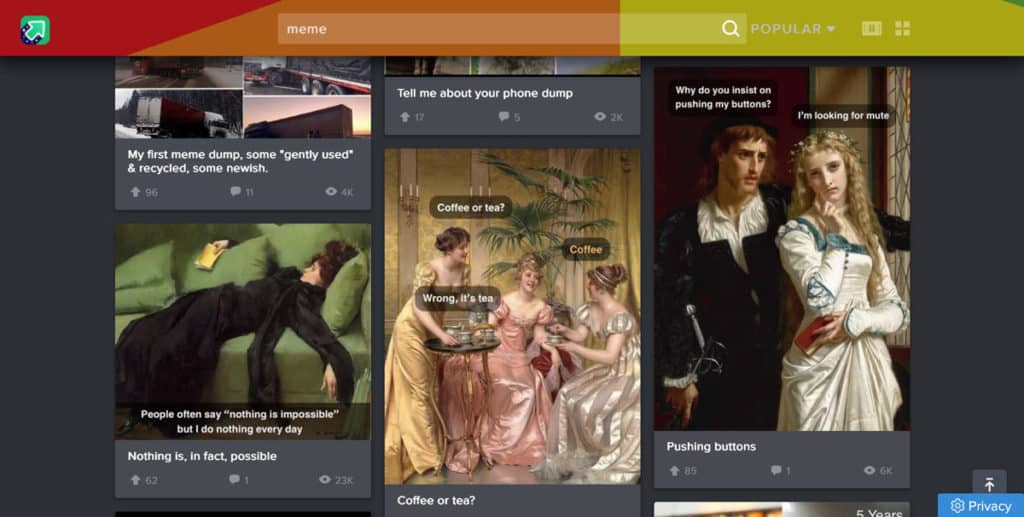
The good news about this is that you can use this for your content. A well placed gif or meme (better yet, a meme gif) can really deliver a punch in a way that few other content types can.
The challenge here is that it requires literacy in the medium. Especially memes have turned into their own kind of language and you really need to know their meaning to avoid coming off as cringy.
However, with both memes and gifs it’s also important not to overdo it. They are both pretty high impact, so if you overload your blog posts with them, it can detract completely from the actual content.
9. Observe Usage Rights Licenses
When using blog images, one of the most important best practices is not to forget that images are intellectual property. That means, they are protected by copyright unless the author has granted a license that permits their usage. For that reason, it’s important to know how to find images that are free to use without getting sued.
One option is to go for sites that are specifically built to offer free-to-use images like Unsplash, Pixabay, Pexels, or Flickr Commons (though in the latter, be sure to check what license is actually granted by the author).

Even Google has the possibility to set their image search to only show pictures that have a Creative Commons license. You find it in the image search under Tools > Usage Rights.
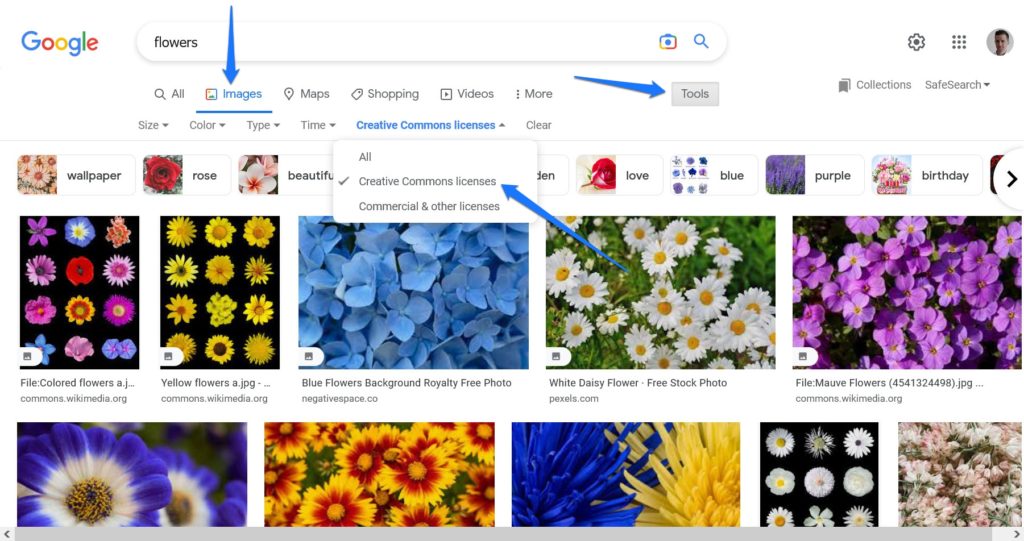
Seriously, don’t use images that you don’t have the license for! There are companies that specifically scan the web for these and it’s not worth the legal trouble.
10. Use High-Quality Images and Optimize Them

What did you think when you first looked at the image above? You probably thought that surely someone made a mistake, right? That nobody in their right mind would use such a blurry image in their finished blog post.
Well, now you know what your readers think when you use low-quality images in your content. So, the first lesson here is: don’t. It makes you look amatuerish and introduces doubt about the quality of your content as a whole.
At the same time, don’t use full-width, super high-resolution images in your posts either. Doing so increases page weight, bandwidth usage, and reduces site speed (if that is an issue on your site, you can find out via speed testing).
The challenge is to find a sweet spot between image size, quality, and performance. Important tools here are using the right file type, size, and taking advantage of image compression. Plus, don’t forget to use a file name that makes sense and add an ALT tag for both visually impaired readers and search engines. You can find detailed tips for that in our dedicated article on image optimization.
Final Thoughts: Blog Images Best Practices
When using images on your blog, it’s important to know how to do it right. That way, you can make sure that they have the most impact and don’t detract from your content or – worse – land you in legal trouble. Above, we have gone over a number of best practices for blog images designed to help you do so.
In the end, images are just as important as your text. They can make or break an article, so don’t skimp on them. Otherwise, you might find yourself out of the picture soon. Figures, doesn’t it?
What other best practices for blog images do you think are most important? Please share your thoughts (and worst puns) in the comments below!
The post Blog Images Best Practices: 10 Ways to Use Images in Blog Posts appeared first on Torque.



0 comments :
Post a Comment